
Coronavirus Delivery Service Alerts: Get the latest info on possible mailing and shipping delivery delays.
Stamps.com Blog
Get the latest information on the mailing and shipping industry.
Get the latest information on the mailing and shipping industry.

As the holiday shopping season quickly approaches, our recent study in partnership with Retail Economics shows that 44% of US customers are still concerned about inflation going into the holiday season. According to our partner, Retail Economics, North American customers will spend $183 billion on holiday shopping through online marketplaces. And your business deserves to be included in those sales! Customer preferences for the holiday shipping season have been made known, and your business still has time to incorporate their feedback before the holiday rush.
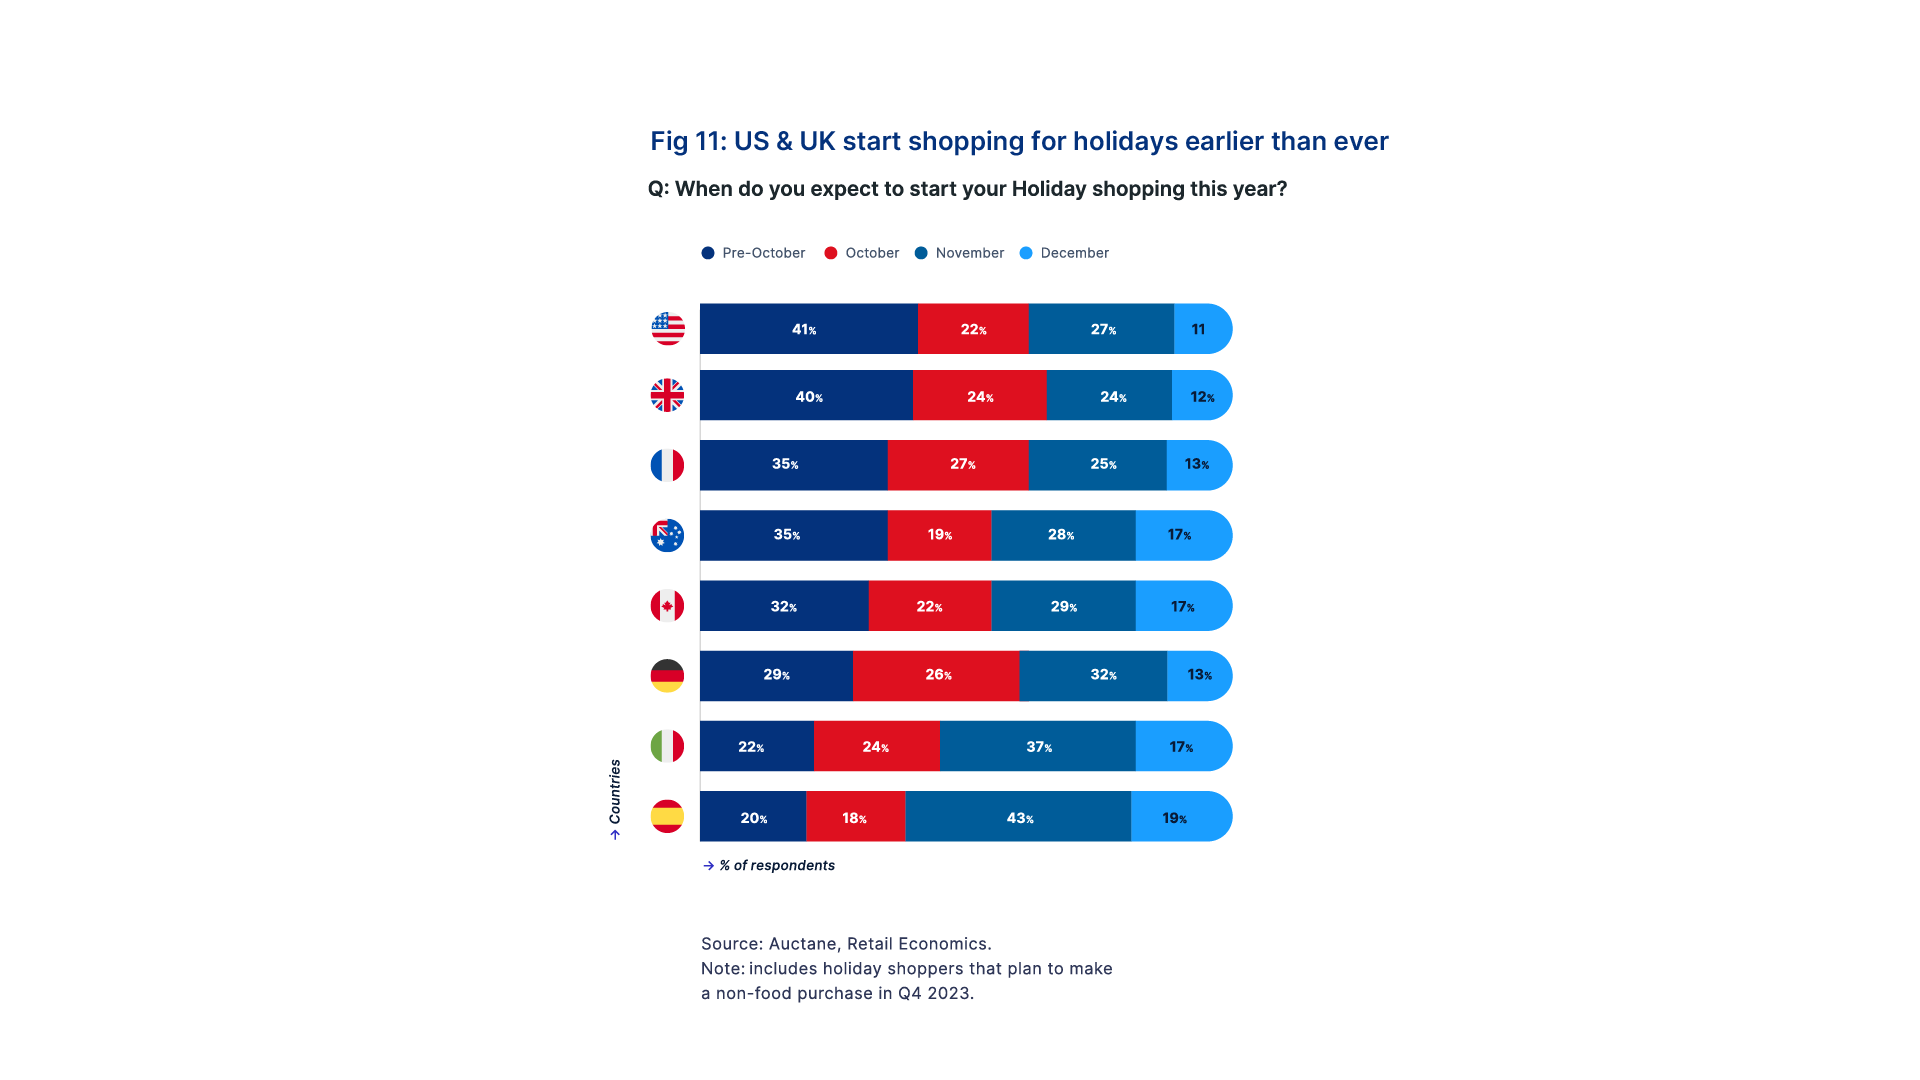
It may seem early, but 41% of shoppers plan to start their holiday shopping before October. With early bird shopping well underway, your business needs to start holiday preparations as soon as possible. Marketing to early holiday shoppers is beneficial because it not only has the potential to boost current sales, but it also gives your business the opportunity to test marketing strategies. Pay close attention to which coupon codes seem to be redeemed more than others and which items they’re being used for. It’ll come in handy when more customers begin their holiday shopping and during big shopping holidays like Black Friday and Cyber Monday.
If you aren’t sure where or how to begin, we recommend customizing the branded ship notification emails feature within your Stamps.com account. Branded ship notifications let your business add promo materials to shipment confirmation emails. Adding exclusive sales to reward early shoppers increases the likelihood of a repeat customer base. Additionally, testing sales materials early is a good way to see what works and what doesn’t before the holiday season officially begins.
To personalize branded ship notification emails:
Click on the chart to magnify.
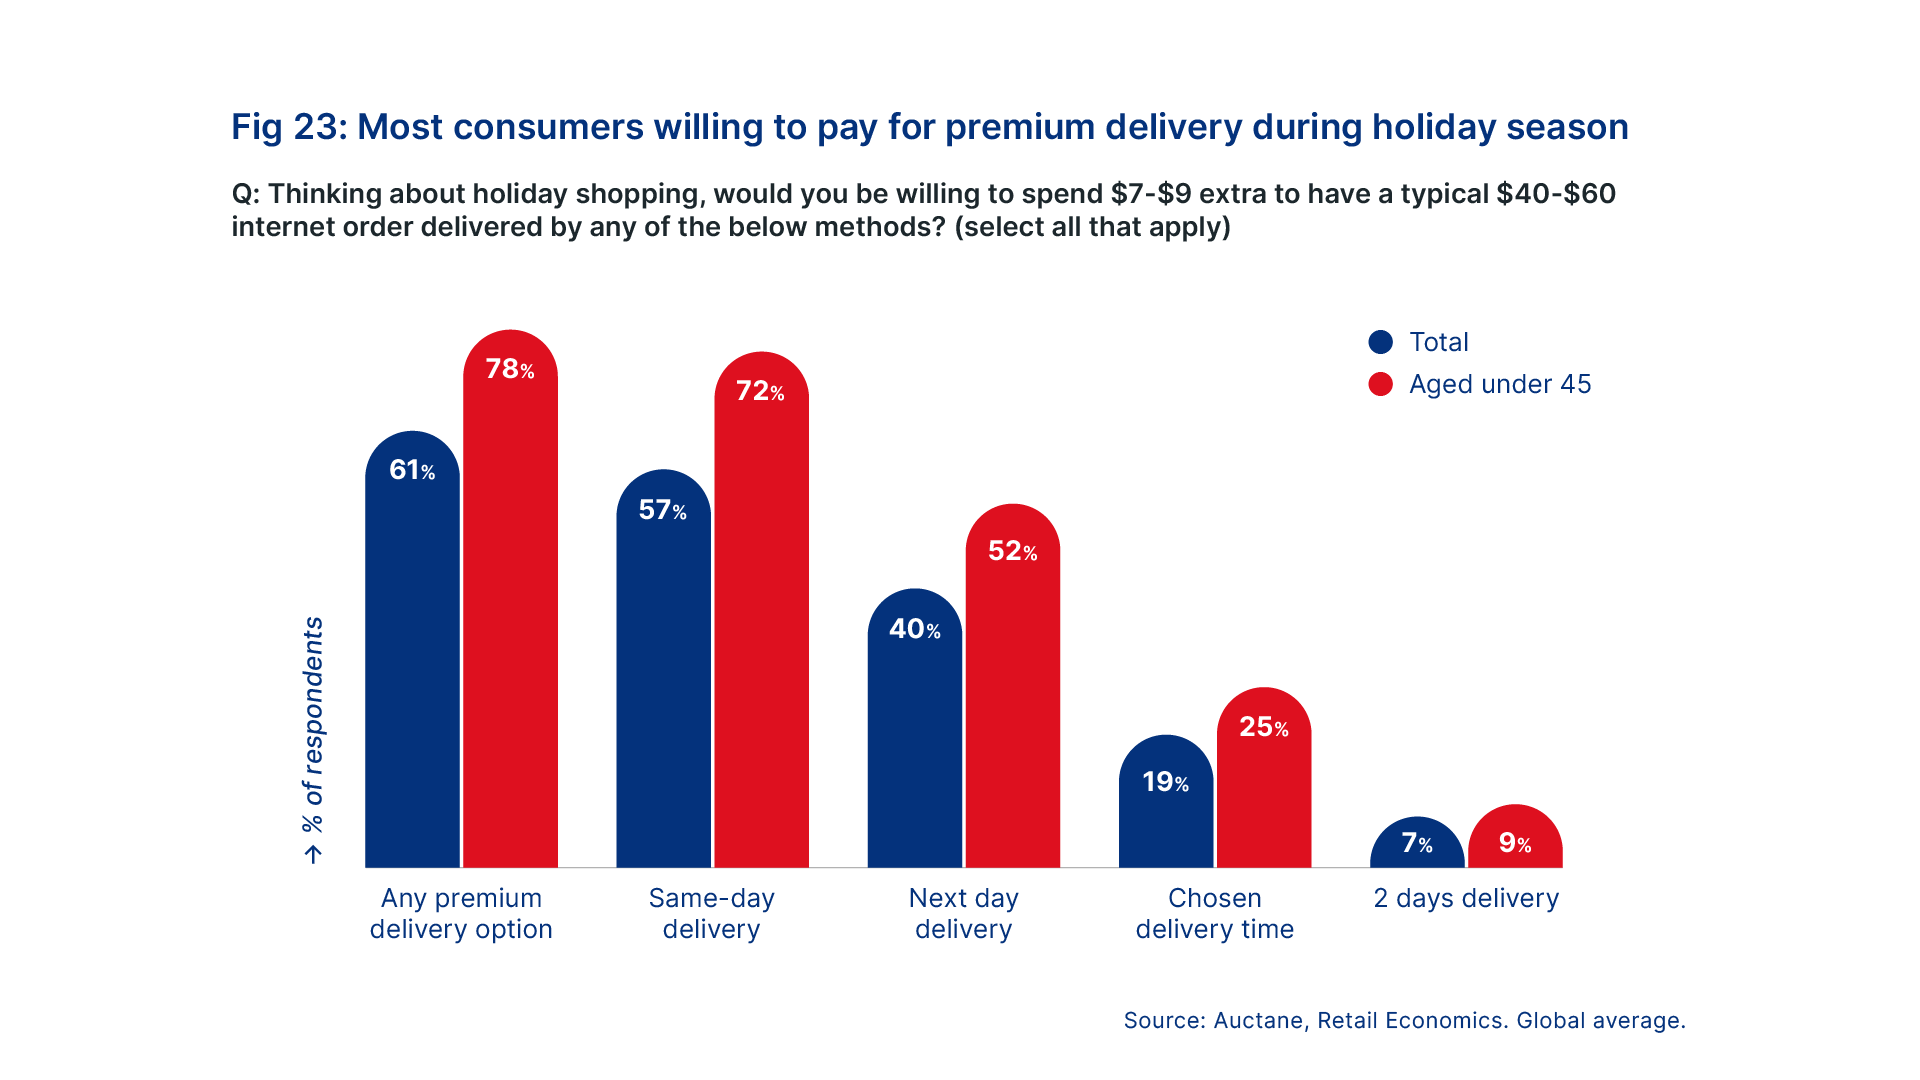
With Christmas landing on a Monday, there may be an increased demand for expedited shipping options. Our study found that 61% of customers are willing to pay $9 more for same-day delivery when placing orders between $40-$60. Many customers are buying stocking stuffers, family gifts, friend gifts, and more, meaning this purchasing threshold isn’t uncommon.
Expedited shipping options are carrier services that offer a faster delivery window than traditional services. These services include overnight shipping, where a customer receives a package the day after it’s ordered (or two days if the item was ordered after the shipping cutoff on the first day). We understand that offering these options may not be available for your small business. As a compromise, it might be worth offering services with guaranteed service delivery options. This way, there’s an available refund option if a package doesn’t arrive within the guaranteed delivery window.*
Additionally, communicating shipping deadlines is crucial. Shipping deadlines are the last dates a package can be shipped and still arrive in time for Christmas. Offering premium shipping options is expensive. But, if your business shares shipping deadlines for the carrier services you provide customers, it’ll decrease the chance of customer dissatisfaction, increasing the chance for repeat business.
*Note: These delivery guarantees might fluctuate during the holiday season, so we recommend reaching out to your carrier directly.
To determine the best shipping options for your business, Stamps.com users have access to our rate advisor. Our rate advisor allows you to compare rates through three different categories: cheapest, recommended, and fastest. These rates are populated based on the shipment information entered, and you’re able to filter by carrier, delivery window, packaging, and price. This way, you can find the best rate for your business and still meet customer expectations.
Click on the chart to magnify.
Our study shows that holiday purchases made through online marketplaces have the potential to reach $253 billion globally, with, as we mentioned earlier, $183 billion of this amount coming from North America. If you’ve been hesitant to sell on marketplaces like Amazon in the past, now’s the time to start. Stamps.com users can easily integrate stores and marketplaces into their accounts so that eligible orders show on the orders screen.
With eligible orders automatically imported to your Stamps.com, it’s easy to create labels and packing slips. After your labels are printed, we’ll send the tracking information to Amazon, so they can send shipment confirmation emails to your customers. Amazon offers seller support within the seller portal for additional help with Amazon questions, and Stamps.com users can reach our support team via phone from Monday-Friday, 6am-6pm PT at 1-855-889-7867 or via email, with a 1-2 business day response time.
Amazon has announced that October Prime Day(s) will return this October 10th-11th, giving your business the opportunity for a test run. Early holiday shoppers will more than likely take advantage of Prime Day deals, so it’ll also help your business predict popular holiday items. Keep an eye on which items are flying off the shelf vs the ones that are collecting dust, and use these trends when planning holiday inventory.
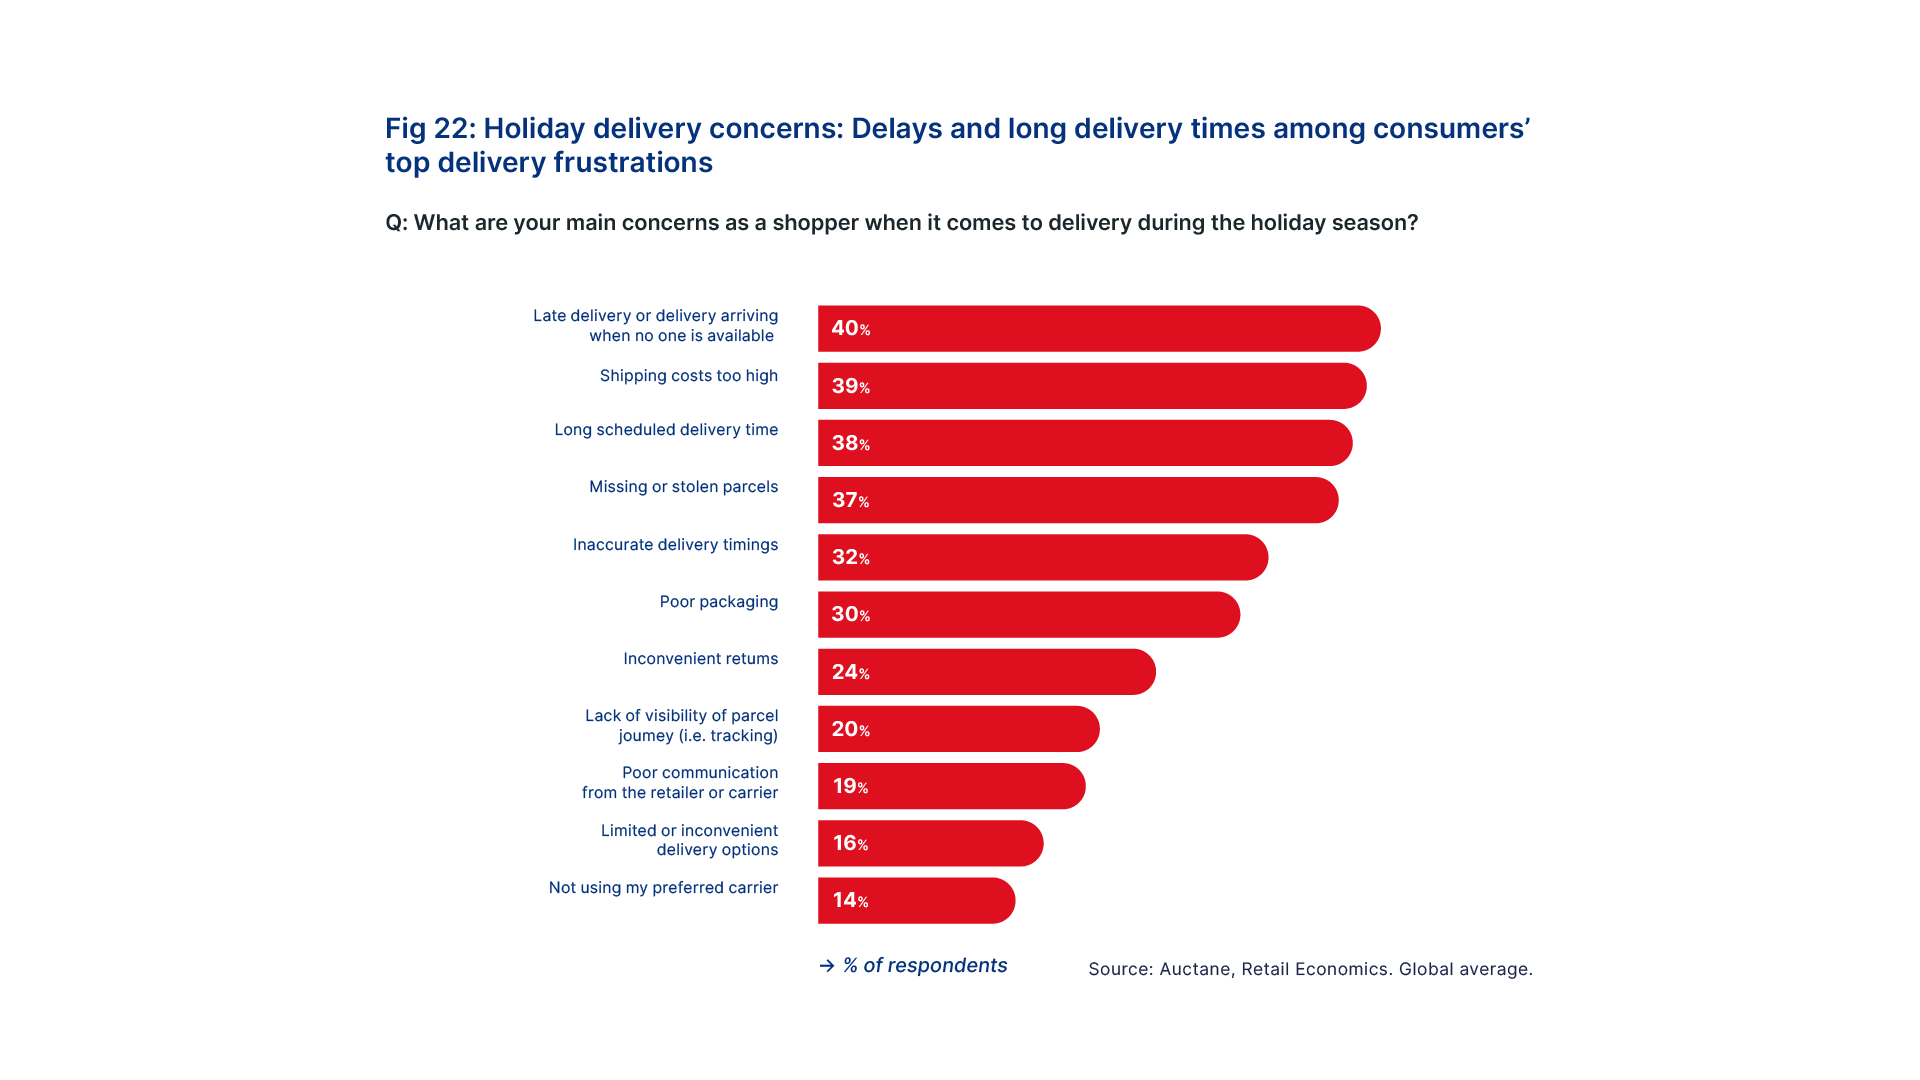
All of the upcoming holiday gatherings may mean your customers aren’t home whenever packages are set to arrive. Our study found that 37% of customers are worried about packages being stolen, so it’s time to make shipping insurance a priority. Most carriers include either insurance or declared value with their services. These insurance options are usually around $100-$200, depending on the service, but some services do come with the option to purchase supplemental coverage. If a package is damaged or lost, you can file a claim to see if you’re eligible for reimbursement.
For high-value items, it’s also worth considering extra third-party shipping coverage from providers like our partner, ParcelGuard™. The cost of ParcelGuard will vary by the amount of coverage added to a shipment and can be added in the Mail or Orders tab; it’s also charged in the cost of your label, so there’s no need to worry about invoicing or surprise charges. ParcelGuard claims are filed electronically and through your Stamps.com account. Give your customers the gift of security this holiday season and offer shipping coverage options.
Click on the chart to magnify.
This holiday season is on track to be a big one for ecommerce merchants. Customers are already preparing their shopping lists, and some are already shopping. Here are a few ways you can make sure this holiday season is a prosperous one:
Keep the holiday season merry and bright with a trial to Stamps.com.
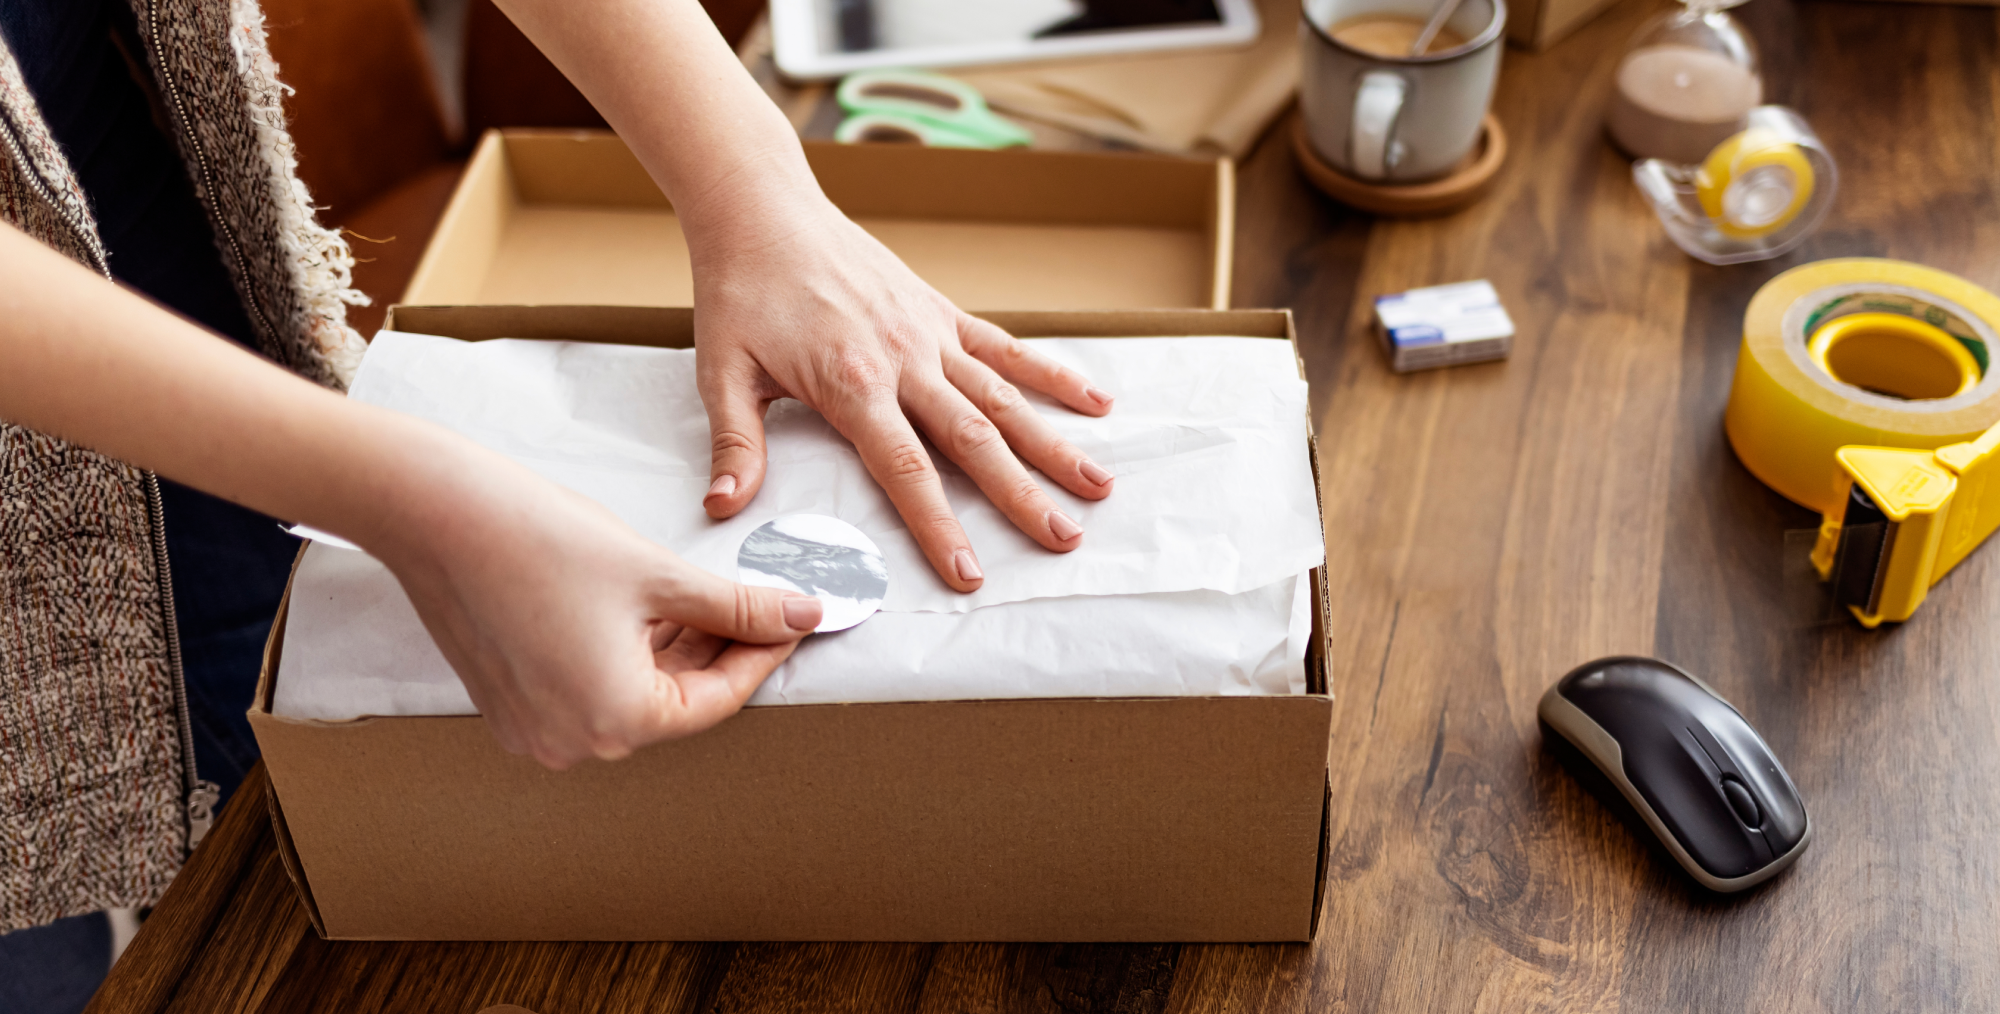
Posters can be found anywhere from college dorm rooms to home offices. Whether a poster is autographed and special edition or simply a reprint of someone’s favorite movie, they can easily tear or suffer damage in transit. USPS does offer free small and medium poster tubes, but shipping posters also requires understanding how to package them to avoid ripping. Keep posters and your shipping process intact, all while using Stamps.com to help.
USPS currently offers free small and medium poster tubes. Each size can be used with Priority Mail® or Priority Mail Express® services and can be ordered from USPS in packs of 10 or 20. These cardboard tubes can be shipped directly to your home and/or business for free.
These tubes and other supplies can also be ordered through your Stamps.com account. To order free USPS supplies:
That’s it! Your supplies should arrive within 7-10 days of order. To order larger quantities of items, call USPS directly at 1-800-610-8734.
The tracking included with free USPS Priority Mail® tubes is the same tracking included with other Priority Mail® packaging and services. Packages can be tracked door-to-door, meaning your customer can track a package from the time of label creation to delivery.
While posters aren’t necessarily fragile items, they’re still delicate and can be bent, ripped, and damaged. The key to preventing posters from being harmed in transit is all in the packaging and customer communication.
Stamps.com keeps shipping posters simple. You aren’t required to scroll through multiple package types when shipping tubes. Select “packages” as the mailpiece type. Additionally, you can utilize automation rules to automate your shipping workflow. Create a rule to automatically apply Priority Mail®, package dimensions, and “package” as the mailpiece type to orders, so your posters are easier to ship.
Unroll a 30-day free trial to Stamps.com today.
Commuting from work to home and vice versa does give you time to catch up on your podcasts (you know we love podcasts), but at what cost? We spend so much time commuting to different spaces, and it adds up. Stamps.com gives merchants the ability to create and print labels with a few clicks and schedule carrier pickups. Additionally, creating a workspace to ship packages from home provides more flexibility for your workday. Build up your podcast backlog and start shipping from home.
Over the past couple of years, many businesses and entrepreneurs have shifted to work-from-home and/or hybrid operations. Shipping from home gives you more flexibility throughout the workday, as you aren’t stuck in a communal office space and can create a more personalized workflow. You also don’t need to worry about renting an office space, which can be costly.
Additionally, Stamps.com merchants can save up to 84% on USPS shipping rates. And when you ship UPS on Stamps.com, you get access to deep discounts of up to 82% on UPS international services, 78% on UPS® Ground services, and 73% on UPS Next Day Air® and UPS 2nd Day Air® services*. Shipping from home with Stamps.com provides you with more freedom throughout the day and saves your business time and money with affordable carrier services and no daily commutes.
*Discounts off UPS daily rates. Rates are limited to shipping from the U.S. only. Rates and any
applicable discounts are subject to change at any time without notice.
If you’re new to shipping from home, the most difficult part is knowing where to start. There are supplies to be purchased and organizing to be done. Let’s start with the basics. Here are a few supplies we recommend keeping on hand:
Be sure to take note of your supply list and use it as an inventory guide. Which supplies do you run out of faster than others? Which supplies never seem to be used? Avoid overstocking and understocking by using the handy list above.
Creating an organized workspace doesn’t need to break the bank. Discount stores often have crates, organizers, and even some shipping supplies available. Also, check your utility closet, garage, and other storage areas for unused storage tubs, as they’re a great resource for staying organized. If you’re strapped for space, utilize your wall space! Purchasing racks and hanging shelves gives you more space while keeping supplies visible, decreasing the chance you’ll buy supplies you already have.
Speaking of visibility, designate specific workstations for each step in the shipping process. Creating an organized space for label creation, printing, and packaging will help prevent applying the wrong label to the wrong order and boost customer satisfaction. It’ll also save time in the long run, as you’ll already have a system in place for the holiday season and other busy times.
You’ve created the workplace of your dreams, so it’s time to start shipping from home. You’ve logged into Stamps.com, and you’re ready to print your first label. The question is, how do you create a label through Stamps.com? The answer will depend on whether or not you plan to integrate your store or marketplace through Stamps.com. If you have integrated your store or marketplace through Stamps.com, follow the steps below. If you plan to create manual orders, skip down to the next section.
Select the checkboxes for the order or orders you would like to create labels for. If you’d like to create labels for all orders, click the Select All box.


Locate and select the Print button.

Choose how your labels will be printed from the Printed On menu.

We also recommend selecting the Email Tracking Details to Recipients box to send customers a tracking link if an email address was provided.

If this is your first time printing labels, you can select Print Sample to confirm your labels are printing correctly.
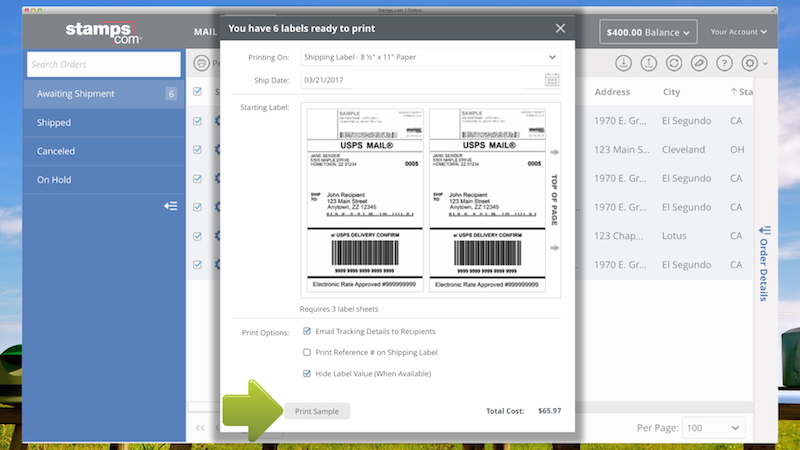
Once you’ve printed a sample, click the Print button.

Congrats! You’ve officially printed a label.
**Note: These are directions for Stamps.com Online merchants. You can find the directions for Stamps.com PC Software merchants in our Learning Center.
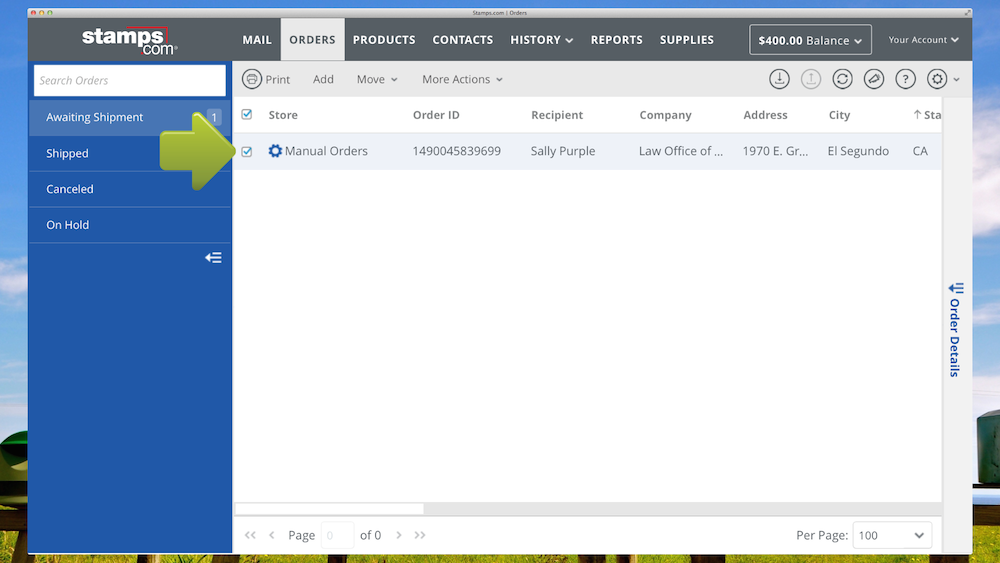
Click on the Orders Tab.

Next, select Add from the Action Control Bar.

Find and click the Manual Order button.

Your manual order will appear on the order screen, and the order details panel will be visible. Enter the shipping address, package weight, and select your carrier service.


Once all of your package’s information has been entered, click the Order Details icon. Then, select the Collapse Panel button.

Your order will then appear on your order dashboard and is ready to be made into a label! To print your label, you’ll follow the last few instructions from the previous section.
***Note: These directions are for Stamps.com Online. For directions on creating a manual label through the Stamps.com PC Software, visit our Learning Center.
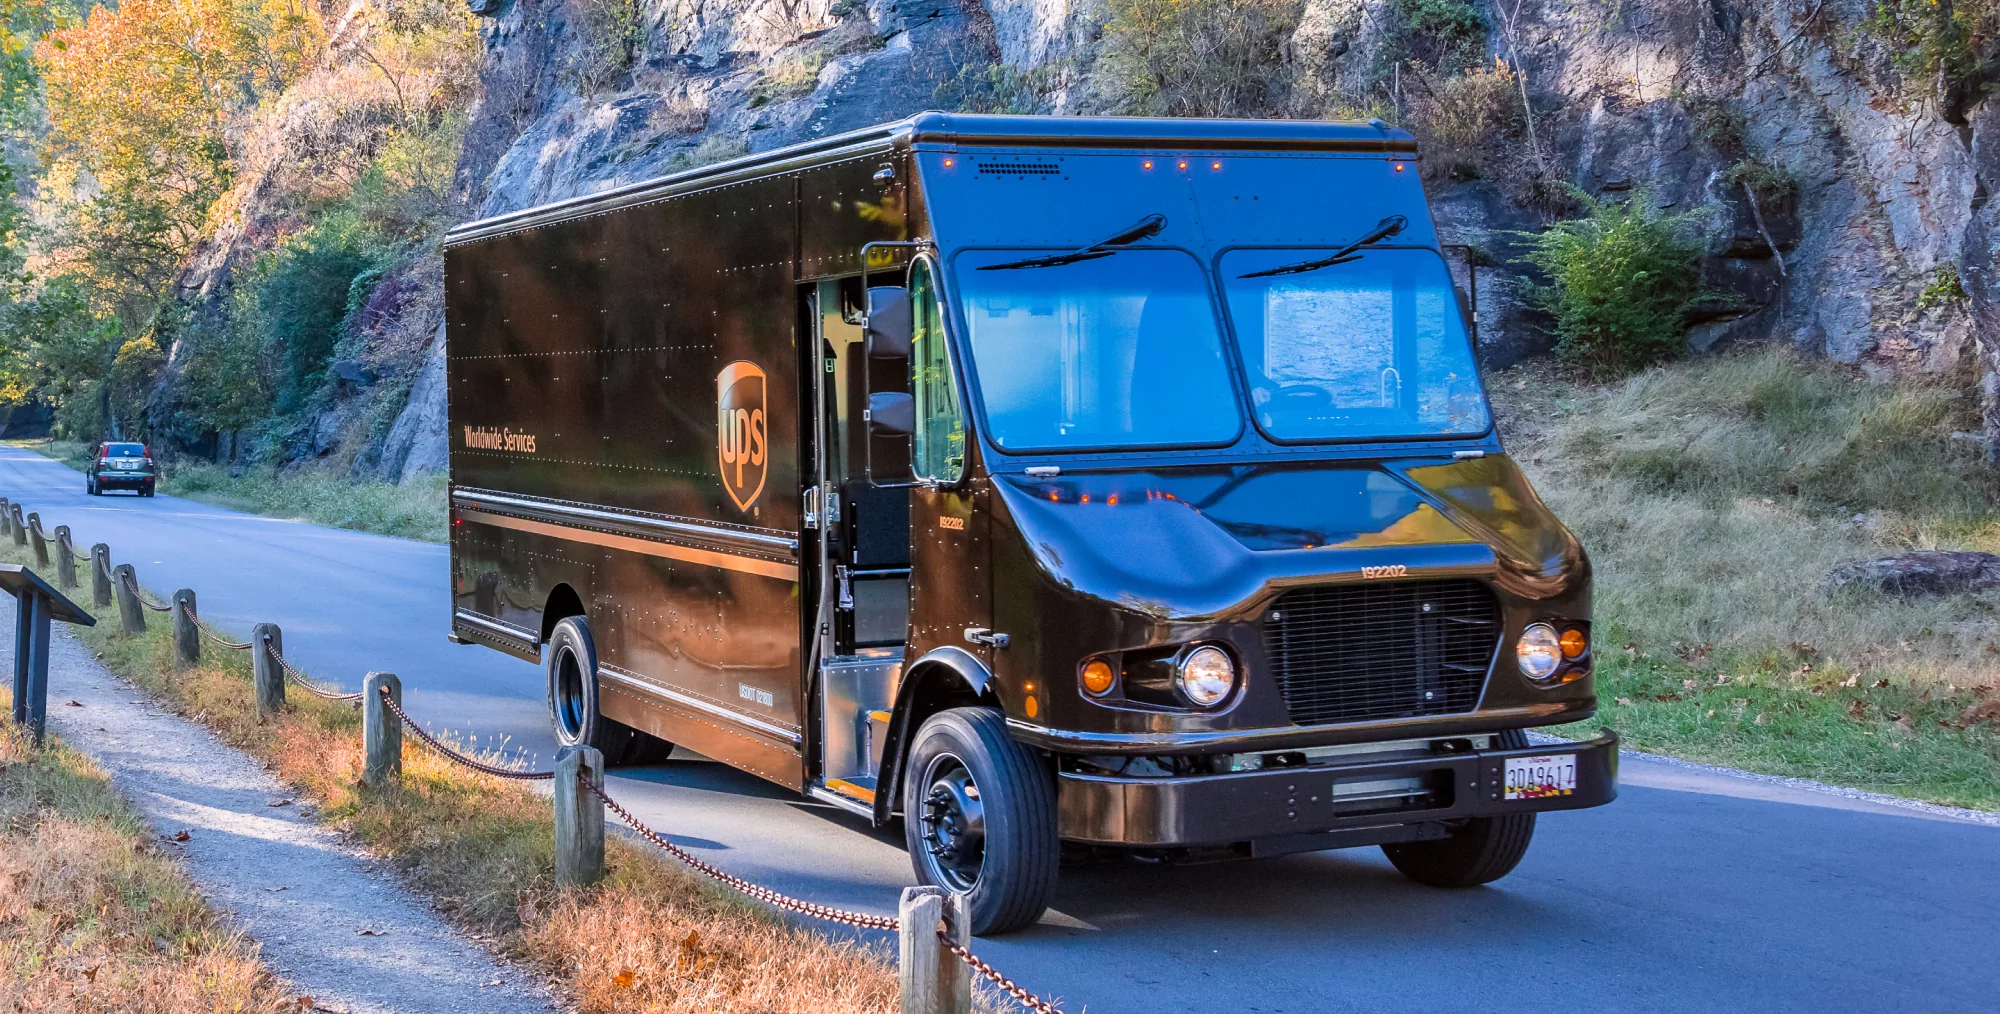
Stamps.com provides merchants with carrier services from USPS and UPS for domestic and international shipments and GlobalPost for international shipments. With this variety of carrier services at your fingertips, shipping from home has never been easier. Available services for each carrier include:
USPS:
UPS
GlobalPost
If you aren’t sure which carrier service works best for your order, use our rate advisor to compare carrier rates in real-time. Stamps.com allows merchants to see the cheapest and fastest carrier options available as well as our recommendations to select the best options for your business.
Once you’ve established a ship-from-home workflow that works, you’ll want to stay in the zone. The good news is that Stamps.com also offers USPS and UPS pickup options, so you can keep working with minimal interruptions.
USPS pickups can be scheduled through Stamps.com for free if at least one of your packages uses Priority Mail Express®, First-Class Mail International®, or Priority Mail® as the service. Merchants also have until 2AM CT to schedule a USPS pickup for the same day. After this time, a pickup will have to be scheduled for the next day. If you aren’t home or can’t be present for a USPS pickup, don’t worry! Just let your carrier know where to find the packages when scheduling your pickup.
On-call UPS pickups can also be scheduled through Stamps.com for an additional $4 per pickup. You can also drop off both USPS and UPS packages at The UPS Store® if you find yourself out and about or need a break from shipping. You can find the nearest location through The UPS Store® locator.
Start shipping from home with a free 30-day trial to Stamps.com today!
Are you looking for an affordable and reliable way to ship lightweight, low-value items? Look no further! With UPS® Ground Saver, you can send your items within the 48 contiguous states of the US cost-effectively. With its variety of features and benefits, UPS® Ground Saver is an economy, residential, ground delivery service. It’s perfect for your lightweight, non-time sensitive packages.
UPS® Ground Saver is a shipping solution that helps small businesses and consumers save on shipping costs without sacrificing reliability or speed. UPS® Ground Saver combines the consistency and reliability of the UPS network at an extremely competitive price.
With UPS® Ground Saver, you’ll get the convenience of seamless door-to-door tracking, which means you can keep track of your package every step of the way. This feature can be especially important for small businesses that need to keep an eye on their inventory and customers who want to know exactly when their packages will arrive.
Secondly, UPS® Ground Saver offers flexible delivery times that include Monday to Sunday, which means you don’t have to wait for a specific day of the week to receive your package. This feature is perfect for customers who have busy schedules or businesses that need to receive shipments outside of traditional business hours.
Finally, if you frequently ship small items that weigh less than 1 pound, you’ll appreciate the affordable rates that UPS® Ground Saver offers.
When it comes to shipping lightweight residential packages, traditional shipping methods can quickly become expensive. With UPS® Ground Saver, you can enjoy cost savings while still receiving reliable delivery services. This can translate to significant cost savings for small and medium-sized businesses and consumers alike. Plus, with the added benefit of package tracking and delivery confirmation, you’re always in the know.
If you’re not already a Stamps customer, the first step is to sign up for a Stamps account. Once you’re logged in, you can start using UPS® Ground Saver right away. All you need to do is select the UPS® Ground Saver option at checkout and enter the weight and dimensions of your package. The shipping label will then be generated with the discounted UPS® Ground Saver rate.
If you’re already a Stamps customer, you’re in luck – you already have access to UPS® Ground Saver! Simply select the UPS® Ground Saver option at checkout and follow the same steps as outlined above. It’s that easy!
So don’t hesitate to start saving money on your shipping costs with UPS® Ground Saver and Stamps today.
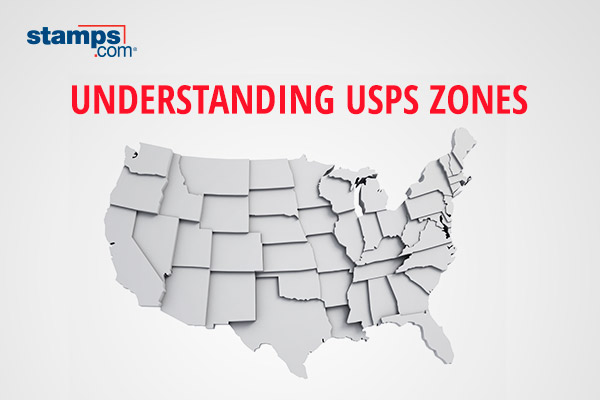
It’s commonplace to think about a destination in miles. You usually have an idea of how far you’re traveling, even if it’s only by the number of cities and states you’ll pass through. Shipping a package follows the same principle. You are aware of the distance between you and your customer, but you might not be familiar with how shipping carriers, such as USPS, calculate this distance to determine your shipping expenses.
USPS divides the US into shipping regions called zones, and this mileage is used to determine the cost of certain packages. Depending on the carrier service used, the distance your package will travel is then used to help determine your shipping costs. TL;DR: the further your package is traveling, the higher the shipping cost. The USPS services that use zones to determine cost include:
However, flat-rate package costs are not determined by USPS zones. Instead, flat-rate packages can be used for shipments up to 70 pounds and will be charged the same price per box size, regardless of the destination.
USPS has broken down the US into nine zones called Zone 1-9. These zones range from within 50 miles to 1801+ miles. Each zone and the mileage it covers can be found below.
*This doesn’t apply when shipping to between the three-digit zip codes of 962-969.
Shipping adjustments are additional fees added to your shipping costs. These fees can range from entering incorrect shipping dimensions to using the incorrect packaging for a shipping service. When it comes to zones, adjustments and penalties can be given if a package isn’t shipped through your local post office. There’s also the risk of a package being incorrectly routed if an incorrect address is entered or the address is ineligible, and ultimately, the package can even be returned. Here are a few tips to avoid adjustments:
Fortunately, Stamps.com merchants don’t need to memorize and manually enter zones because zones are automatically accounted for when a label is created. However, it’s crucial to find the best shipping rate for your package, especially when packages are traveling long distances. Whenever you create a label on Stamps.com, simply select the Compare Rates and Services option from the Carrier drop-down menu.
Once selected, you can browse rates through our rate advisor with three different categories: Cheapest, Recommended, and Fastest. The cheapest category filter lists the available rates and services from cheapest to most expensive. The recommended category shows the Stamps.com recommended shipping methods. And finally, the fastest category filters rates by the fastest available carrier rates. You can compare rates in real-time and find the best deal for your business, especially when it comes to long-distance shipping.
Start your 30-day free trial at Stamps.com today!
Call us toll-free at 1-888-434-0055
Monday–Friday, 6am–6pm Pacific Time